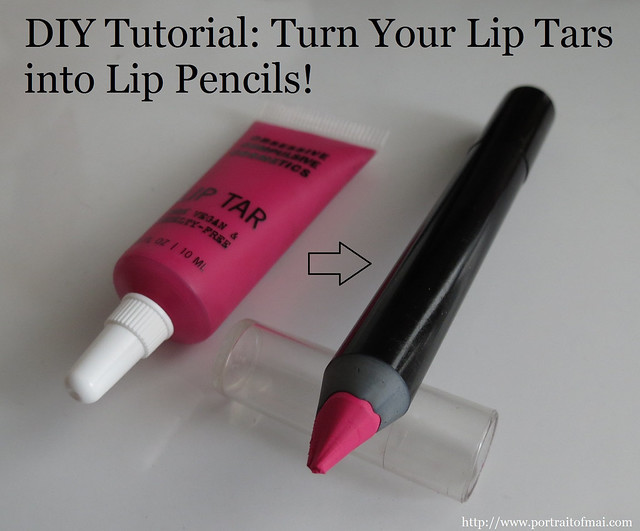
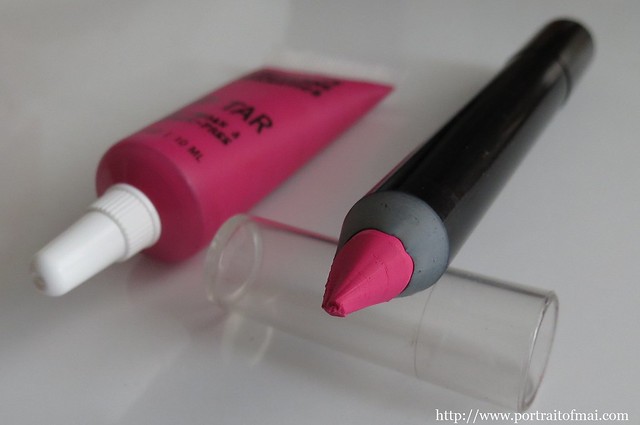
If you've been following me on my Instagram or Twitter, you'll know that my pet project has been turning my lip tars into lip pencils. It's an easy way to make your lip tars into something more travel-friendly and if you've had difficulty applying the lip tars with a brush, you'll find that the lip tars are easier and more forgiving to apply in pencil form. A lot of people have been asking so here is my tutorial on how to turn your lip tars into lip pencils!
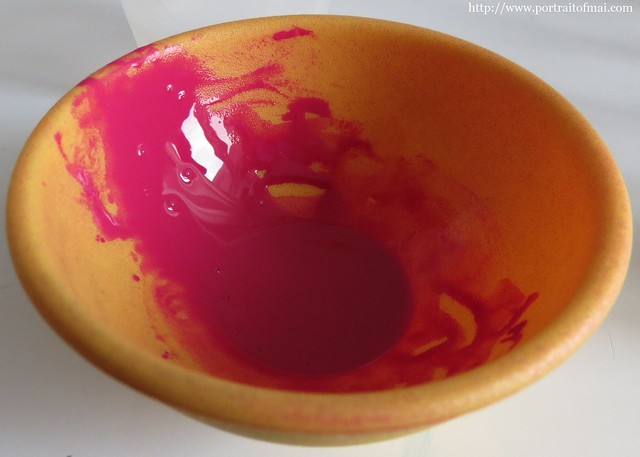
I've found that these have a good wear time; after eight hours, the color started wearing away on the inside of the lip with the majority of the color still on the lip. I also thought this helped prevent some of the bleeding into the lip lines that I had with the lip tars in liquid form.
Disclaimer: I have only done these with the regular lip tars, not the stained glosses or metallic lip tars so I can't say for sure how your product will turn out if you do use this tutorial with your stained glosses or metallic lip tars.
*Please do not use my tutorial or any of my blog content for commercial purposes.*
This post will be picture heavy so the tutorial will be under a read more tag! Please click to see the rest of the post.
I need to give credit to Koren/Enkore Makeup for giving me the inspiration to do this project. I was inspired after watching two of his videos, one on turning your lip tars into lipstick and one on creating your own eyeliners and I took aspects of both videos for this project. Please check out his videos and channel!
Before I get to the tutorial, I wanted to mention that I purchased the majority of my supplies from TKBTrading.com but that I am not affiliated with them and I am not being paid for this post. They're just an awesome company that I like to support because they have a fast turn around time, cheap shipping, plus they're based in California so I always get my order quickly. TKBTrading will ship internationally however international shipping rates can be expensive. Please refer to TKBTrading's policies and information on international shipping.
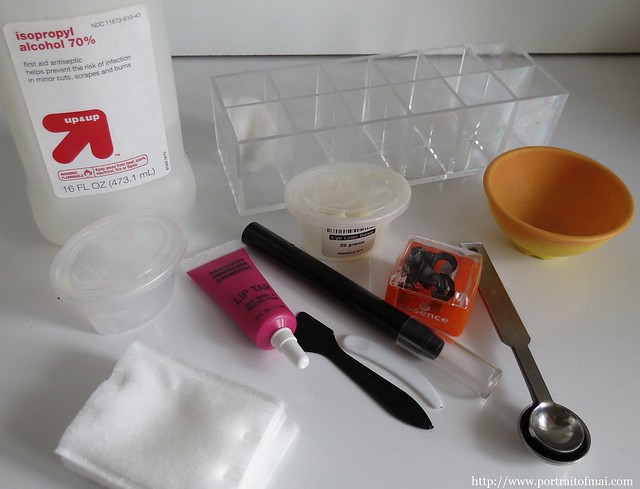
For this, you'll need:
- Lip Tar of your choice (I'm using Pretty Boy for this tutorial). TIP: If you have a custom lip tar mix that you like to use, instead of always having to mix it up each time you go to use it, you can make a whole pencil with that custom color! These retail for $18.00.
- Chubby Pencil Blanks. (Don't get the slimline ones for this process) I purchased my blanks from TKBTrading. The pencil has three parts: the cap, the barrel itself, and the bottom cap to close it. I've noticed that the bottom caps for the pencil blanks can be a bit loose so you may want to adjust their fit with pliers after filling. Five pencils will retail for $1.45 or 29 cents each, twenty five pencils retail for $7.25 or 29 cents each, and 100 retail for $29.00 or 29 cents each.
- Premade Eyeliner Base. I purchased my eye liner base from TKB Trading. You want this eyeliner base to be very firm because when you add the lip tar, it'll soften up to the perfect consistency. The base from TKB Trading is NOT VEGAN as the formula contains beeswax so this will de-veganize your lip pencils. If you're wondering if the eyeliner base is lip safe, I did ask TKBTrading and they confirmed that it is. 20 grams which will make about six pencils retails for $3.00 or 100 grams which will make about thirty-three retails for $9.00.
- Measuring spoons (metal if possible) or a scale that measures in grams. I prefer the scale for accuracy. Don't get a scale that only measures grams in even numbers (I made that mistake the first time -__-)
- A flexible heat-safe mixing bowl. I prefer using this silicone mixing bowl from TKBTrading for $1.75 but Amazon also sells this set of four
for $5.90. FYI: Your bowls will get stained from the lip tar but it's a superficial thing, I assure you that my containers have been thoroughly cleaned.
- Melting container for your eyeliner base that is also microwave safe. If you purchase your eyeliner base from TKBTrading, they also give you an extra plastic container to melt your base in which I used. They sell extra ones on their website too.
- Sharpener that will sharpen plastic pencil barrels. TKBTrading sells one but I have gotten great results out of my Covergirl and Essence Cosmetics sharpeners. You want one with a double barrel basically.
- Small mixing spoons for your mixture. I used some rounded spoons from TKBTrading but you can get a small pack of spatulas (the tester kind) from Sally Beauty Supply. At TKBTrading, 50 scoops retail for $3.00.
- Rubbing alcohol to sanitize everything
- Lint-free cotton to clean everything. Don't cheapen out on me and get some linty cotton balls, splurge a little and get some good cotton rounds.
- Plastic wrap for wrapping your pencils for filling
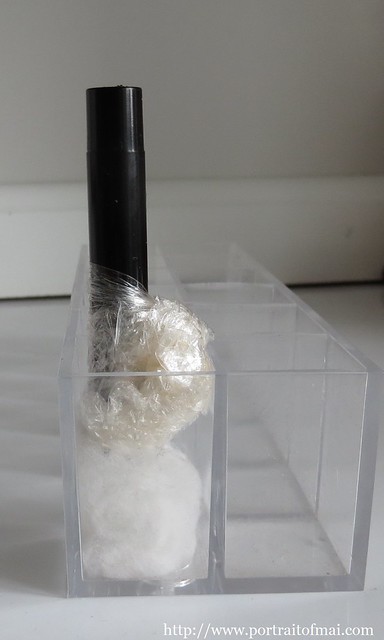
- A stand to hold the pencils upright for filling. I used a lipstick holder and some cotton
Suggested:
- Gloves. Optional but if you'd like to keep everything especially clean, you can use gloves as the method can be a bit messy and you may get some lip tar on your hands
(Not pictured but recommended)
- A Preservative of some kind. Although the eyeliner base that I use already has Cap-5 preservative added to the mix, you should add an extra amount if you'd like. TKBTrading sells Cap-5 which has a recommended use level of .5-1.5% by weight in a product. I believe there is about 1% of Cap-5 in the eyeliner base but I will update if I am incorrect. I chose to add two extra drops to ensure that by weight, there was at least 1.5% level of perservative in the pencils.
The cost for each pencil just in the barrel and the eyeliner base is 79 cents which is very reasonable.
RECOMMENDED SHELF LIFE: These should last up to 6 months.
Procedure:
The first step is gather all your materials. The second step is WASH YOUR HANDS. I mean it, you can't do anything else until you do and I mean the hot water and 30 seconds of vigorous scrubbing. After that, sanitize everything with the alcohol: the pencil barrel, the bowls, the mixing spoons, etc. If you have gloves, now is the time to put them on.
(Sidenote: when it comes to filling the pencils, I was originally using a syringe because I thought the opening would be too narrow to pour the mixture down like it is with the slineline lip pencils. Thankfully through experimentation, I've found that if the mixture is warm enough, it can be poured straight down without any trouble. I've been sharpening the pencil down to the nub to see if there are any air pockets or gaps in the barrel and there have been no air pockets or distortions in the pencil.)
Now prep the pencil by taking some plastic wrap and double layering it by folding it over. Then tightly cover the tip of the pencil barrel with the plastic wrap so nothing leaks through. Be sure to take the bottom cap off to prep for filling.
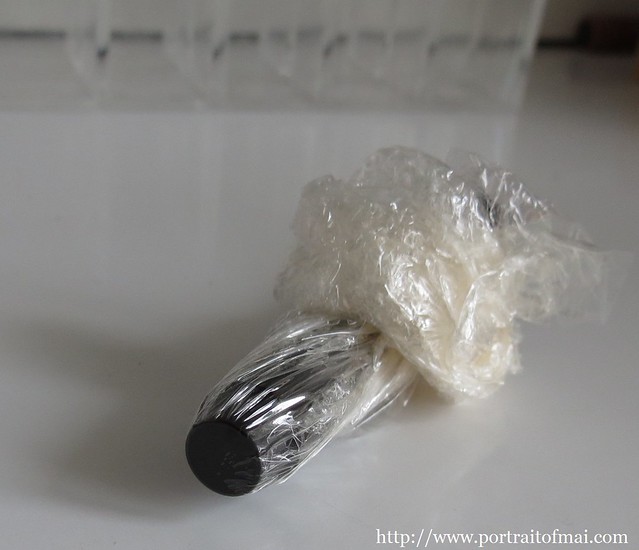
Wrap the plastic wrap with a rubber band to prevent leaking.

Stand the pencil barrel upright in your stand or holder to prepare it for pouring.
Now onto the lip pencil formula! The ratio for the lip pencils is 3:2, 3 grams of eyeliner base to two grams of lip tar. Now I found that the ratio made for a pencil that was firm enough to be sharpened yet soft enough to have great color payoff. The pencil leaves a satin, not glossy or shiny, finish to the lips.
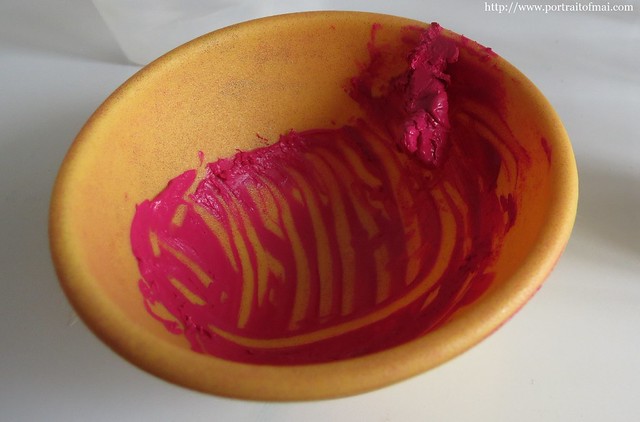
The recipe makes a little too much for the pencil so you will have some mixture left over but you can easily dispense that into a small metal pan to create your own lipstick palette. It's better to have too much mixture than to be left with too little with a sad half empty pencil. If you're using a teaspoon to measure, 3 grams was a little less than 3/4 tsp and 2 grams is a little less than a 1/2 tsp.
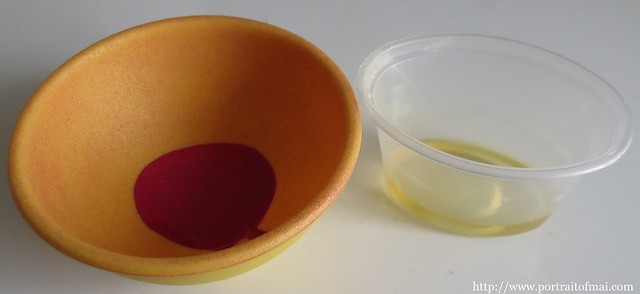
If you're using a scale, measure 3 grams of base out then melt it in 30 second bursts in the microwave. It should take about two (on high heat) or four (on half power) before it melts. Please be careful, you're working with a hot container and hot liquids. The first rule of this tutorial is that you do not let the eyeliner base boil. The second rule of this tutorial is that you do NOT LET this eyeliner base boil.
Stand the pencil barrel upright in your stand or holder to prepare it for pouring.
Now onto the lip pencil formula! The ratio for the lip pencils is 3:2, 3 grams of eyeliner base to two grams of lip tar. Now I found that the ratio made for a pencil that was firm enough to be sharpened yet soft enough to have great color payoff. The pencil leaves a satin, not glossy or shiny, finish to the lips.
The recipe makes a little too much for the pencil so you will have some mixture left over but you can easily dispense that into a small metal pan to create your own lipstick palette. It's better to have too much mixture than to be left with too little with a sad half empty pencil. If you're using a teaspoon to measure, 3 grams was a little less than 3/4 tsp and 2 grams is a little less than a 1/2 tsp.
If you're using a scale, measure 3 grams of base out then melt it in 30 second bursts in the microwave. It should take about two (on high heat) or four (on half power) before it melts. Please be careful, you're working with a hot container and hot liquids. The first rule of this tutorial is that you do not let the eyeliner base boil. The second rule of this tutorial is that you do NOT LET this eyeliner base boil.
If you're using a teaspoon measure, melt a portion of the eyeliner base and pour out into a teaspoon measure until you've filled it to a little less than 3/4s tsp. If you're pouring the hot liquid into the cold teaspoon, it'll solidify nicely into a solid.
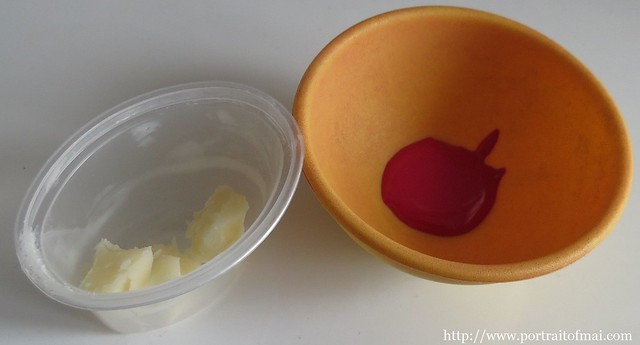
If you're using a scale for the project, measure out 2 grams or a little under 1/2 tsp of lip tar in the flexible microwave safe container. Heat up the lip tar for about 20 seconds to have it warm.
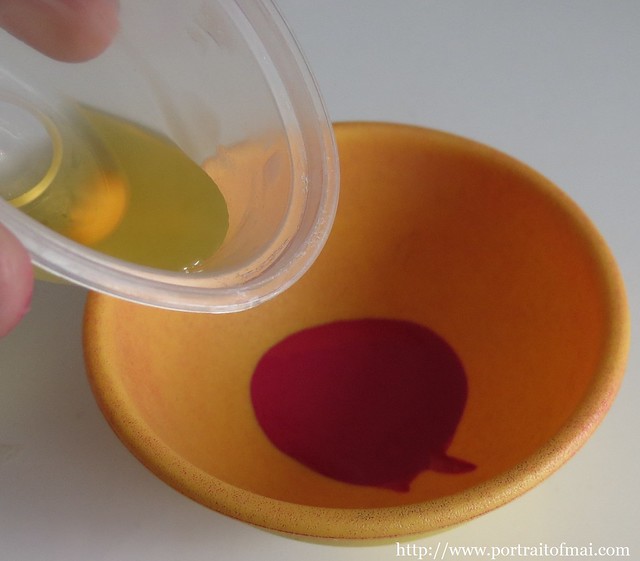
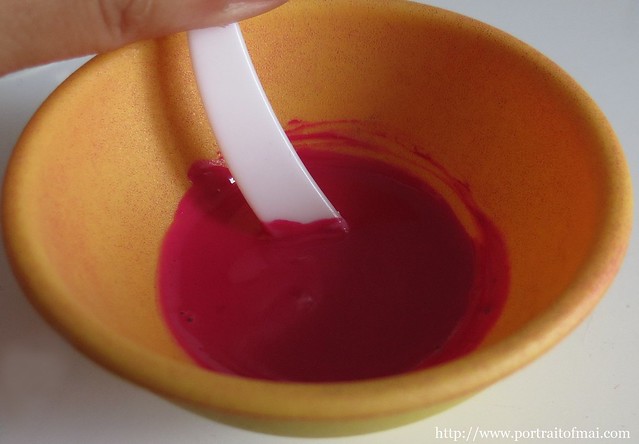
Then pour the melted eyeliner base into the bowl with the lip tar.
If you're using a measuring spoons for the process, don't heat up the lip tar first. Instead, heat both the resolidified eyeliner base together with the lip tar (2 30 second bursts will do it) then mix. Whether you've used a scale or measuring spoons, you should be at the same step with the mixture already mixed together. If necessary, microwave again to get it warm and liquidous state. Be careful when stirring because the mixture will be hot, stir slowly so you don't splash. It should be quite watery.
If you're using a scale for the project, measure out 2 grams or a little under 1/2 tsp of lip tar in the flexible microwave safe container. Heat up the lip tar for about 20 seconds to have it warm.
Then pour the melted eyeliner base into the bowl with the lip tar.
If you're using a measuring spoons for the process, don't heat up the lip tar first. Instead, heat both the resolidified eyeliner base together with the lip tar (2 30 second bursts will do it) then mix. Whether you've used a scale or measuring spoons, you should be at the same step with the mixture already mixed together. If necessary, microwave again to get it warm and liquidous state. Be careful when stirring because the mixture will be hot, stir slowly so you don't splash. It should be quite watery.
Now you're ready to fill the pencils. Again, please be careful, the bowl and mixture will be hot. Gently and carefully, squeeze the flexible bowl into a spout (sorry, that was hard for me to do while simultaneously taking a picture!) and pour the mixture down the pencil barrel. Pour smoothly so you don't get air pockets in the barrel.
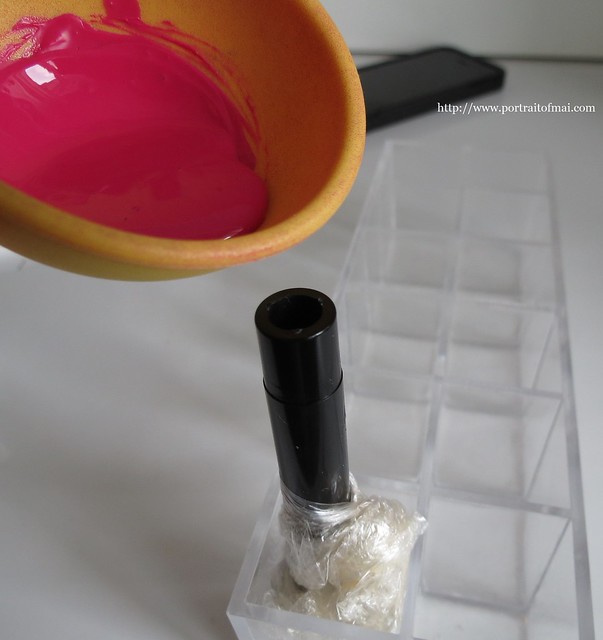
If you don't pour quickly enough, you'll find that the bottom of your pencil isn't fully filled and you'll be left with some leftover mixture.
Remelt the mixture, and then repour it into the pencil. If it's hot enough, it'll just meld with the rest of the pencil.
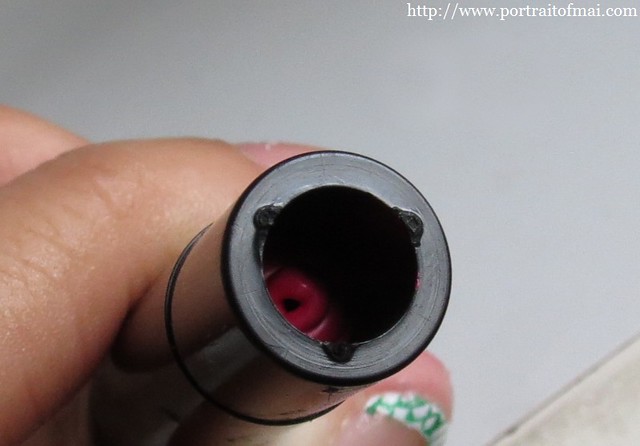
This is a little overfilled but it will shrink a little as it cools.
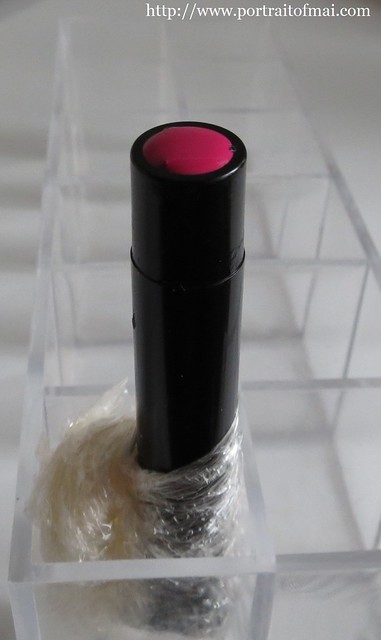
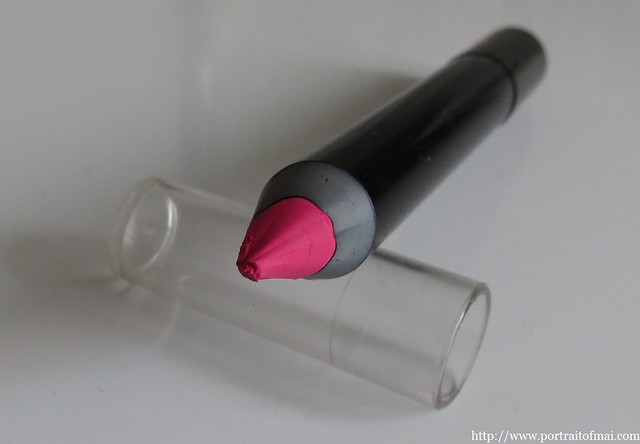
After that, you're done! I take the pencil to the freezer to solidify for about five minutes just to have it firm up. Don't let it freeze all the way. Sharpen it and use! These sharpen to quite a nice point as you can see.
This is a little overfilled but it will shrink a little as it cools.
After that, you're done! I take the pencil to the freezer to solidify for about five minutes just to have it firm up. Don't let it freeze all the way. Sharpen it and use! These sharpen to quite a nice point as you can see.
TL:DR Version: Melt it, pour it, sharpen it, voila!!
I really hope you find this tutorial useful! Please tell me if you encounter any problems with the tutorial and I'll try to help troubleshoot. Again, please be careful since you're working with hot liquids!
Disclaimer: This tutorial is of my own making. All opinions are my own. I'm not affiliated with any brands listed in the tutorial. There are no affiliate links in this post. I did receive Pretty Boy Lip Tar in a press kit from The Makeup Show LA but I'm not being compensated for using it in this post (I've honestly been using up the rest of my lip tars so I found Pretty Boy and used it!)


This is brilliant! Thank you so much for sharing. I had no idea you could buy all of those items to make your own makeup.
ReplyDeleteFantastic! Ever since you posted about this on IG I have been stalking your blog like crazy for the details! Thank you so much for taking the time to make a tutorial.
ReplyDeleteThank you so much for putting this together!
ReplyDeleteIt's a shame that shipping internationally is so expensive from TKB, but I think it would be worth it for me since I hate not
I can't thank you enough for this tutorial. I have such a problem with Lip Tars bleeding on me and can't WAIT to try this!
ReplyDeleteThis is an awesome tutorial! Truly unique and innovative.
ReplyDeleteThis is brilliant! Thank you so much for putting this together!
ReplyDeleteSuper genial esto, sirve mucho me encantó, ¡Ciao!
ReplyDeletebarbarellamaquill-arte.blogspot.mx
OMG this is amazing. I like Lip Tar but sometimes I just don't want to mess with it. This is really cool!!!
ReplyDeleteThis is a fab idea and will also help with the separating issue lip tars have I am gonna have to attempt this although could take me some time as I have so many of them in my kit. Also great kit space saver as the lip tar containers are so awkwardly sized pencils would be a much better option indeed!
ReplyDeleteI think you can email them and they will possibly amend the shipping rate for a small order worth a go anyway x
ReplyDeleteAwesome tutorial!
ReplyDeletethis is sheer genius! I might have to get my courage up to try it sometime.
ReplyDeleteIf you're worried about the cost of shipping, you can always check out with the "Contact Me" form of payment and they'll send you a shipping quote. The ingredients and supplies don't weigh all that much so I'm hoping that everyone will be able to get everything with somewhat reasonable shipping!
ReplyDeleteWow this is a great tutorial. :D I am now thinking to get the supplies and try to make some pencils with my lip tars. :)
ReplyDeleteCould you also attach a swatch of the lip color before and after deporting it to the pencil? xx
ReplyDeleteThis is so neat!!
ReplyDeleteThis is such a clever idea! You could probably mix a couple of lip tars too before hand to get some really unusual shades!
ReplyDeleteWow. Thank you for your post, I don't know why I thought doing something like this would be complicated. I will definitely be trying this in the near future! :D
ReplyDeleteThis is awesome! Thanks!
ReplyDeleteooh great! That's really encouraging to know :D
ReplyDeleteThanks! That's really great to know that they can do that :D
ReplyDeleteI tried doing something similar by mixing Lip Tars with a lipgloss base and pouring into chapstick tubes in hopes that they wouldn't be so drying and would be easier to apply. It was successful for just a short while, then the Lip Tars seemed to suck out all the moisturizing properties and now they just apply chunky. :( Have you had any problems with the pencils over time? I've got to try this.
ReplyDeleteHmm I haven't any problems with my pencils yet. I wonder if the mixture might have cooled unevenly which might be why it's applying a little chunky? Maybe you could try reheating it in a microwave and letting it cool again?
ReplyDeleteWho knows. I went all Lip gloss/Lip Tar happy and made a tube of every color I owned, and all of them ended up doing that. But it took awhile - like maybe a month. And being no expert on anything lip related (avoid that like the plague), I could have melted the base wrong, had the ratios wrong, cooled them wrong, or even all of the above. BUT... there is so much product in a Lip Tar that I could try the pencil even with the same shade I've tried a chaptstick version and still have more Lip Tar in the original tube than I could ever hope to finish in a lifetime, lol.
ReplyDeleteThis almost makes me regret tossing the lip tars I had when I just couldn't get them to work for me. It seems like this would reduce how much they transfer as well as making them practical to reapply.
ReplyDeleteGreat project and thanks for sharing, I will have to try this out myself. Love it xo
ReplyDeletegreat tutorial! Just tweeted it!
ReplyDeleteWow, what an involved process!
ReplyDeleteLOVE THIS!!!!
ReplyDeleteWhat a great post. It's very involved but it really explains it well.
ReplyDeleteThis is awesome!!
ReplyDeleteThis is an amazing post, I can't wait to try this! I love lip tars I've been using them for the last 4yrs. it's been exciting to see them add new colors. I wonder how this would work with their new lip stain gloss?
ReplyDeleteThis is amazing! I'm definitely going to try it with my Lip Tars!
ReplyDeleteI want to try this out!
ReplyDeleteThis is totally amazing. I LOVE the matte finish to the tars, and I'm very glad they can be in such an easy to apply method like this for a "special needs" make up user :P
ReplyDeleteTo help with cleaning, you could use rubbing alcohol or nail polish remover (non-acetone/ acetone free). Make up remover didn't do ANYTHING for me Sephora when I swatched it on my hands, but the nail polish remover did the trick so I didn't have to walk about with streaks of pink/ deep red on my hands.
I am so inspired by this! I'm ordering my supplies now! I love my Lip Tars for their staying power, variety of colors, and because I can mix them, but I'm so tired of having a stained makeup bag and/or a tacky little Ziploc bag to hold them. I found this site when I was looking for a better solution to my little leaky jars. You are such a genius! Thanks for sharing with the rest of us!
ReplyDeleteI am no good at these things. Can I just buy one (or five) lip tar pencil from you?
ReplyDeleteforgive my lazy ass :D
but come to think of it, it'll be a really good business ;-)
This looks so great! I think I'm going to do this, but keep it in a metal pan as opposed to a chubby pencil. I apply my lipstick with a lip brush anyway because it gives me more control, and I think this will help a lot with how frustrating the watery texture of lip tar can be. Thanks!
ReplyDeleteMost new news, Expected elements body lotion products! Our body lotion is made with extra whipped body butterso it absorbs quickly into your skin without leaving a sticky residue. That makes your skin moisturized andsoft.
ReplyDeleteI thought haven’t read such distinctive material anywhere else on-line.http://www.pinterest.com/bubblegumcastin
ReplyDeleteHoly crap this is amazing and badass and yes yes yes!!!!!!
ReplyDeleteAwesome tutorial! I just tried it with Black Dahlia and Radiant and they turned out amazing! Can't wait to try it with the rest!
ReplyDelete